How to Build a DIY Bedframe With Storage
Storage is in our name. Here at Albuquerque Self Storage, we’re all about providing helpful tips as well as an extra space you may need to safely stow away all of your belongings.
We all have valuables and possessions we only need once or twice a year. But what can we do with the objects we’ll need a little more regularly, yet not regularly enough to keep them out on the shelves?
Keep reading to learn how to build a DIY bedframe with storage you can both be proud of and use daily for those need-to-reach extras you’ve got in your home.
DIY Bedframe With Storage: Things to Consider
Let’s be candid, the simpler the project, the better. The design of this DIY bedframe with storage will utilize cube organizers and a few other materials. This will provide all of us do-it-yourself types, at any experience level, the ability to design and build our own DIY Bedframe with storage.
But before we can dive in, here are a few design features that must be considered:
- The size of the room that will hold your DIY bedframe with storage.
- How much room you’re willing to give to your bed frame, and how high up you want your bed to sit.
- Do you want a queen size? Twin?
- Budget
- Desired timeframe
- Access to tools and supplies
DIY Meets KISS: Do It Yourself while Keeping It Simple & Safe
Once you know the answers to all of the above, you have a few different options to reach your goal. As stated earlier, we’ll be creating a DIY bedframe with storage using bookshelves and other minor materials both for simplicity and to save money.
Follow along with this tutorial, where simple and inexpensive meets durable and functional. As with any project utilizing tools, please be sure to study up on safety procedures, and/or have a helping hand nearby. You can also trust the pros at Home Depot to learn more about power tools and how to safely and properly use them.
The Specs, Plan, and How-To
For our purposes of keeping it simple, we will create a DIY bedframe with storage for a twin-sized bed at 38” x 75”. Feel free to use the following specs/measurements to create a larger frame using this same detailed process!
Tools and Supplies
This project will utilize the tried and true when it comes to self-storage: the bookshelf. Or in this case, several cube organizers. How many cubes per unit will depend on the height you want for your bedframe.
Feel free to build the units yourself, but we’ll keep it simple with sturdy, already made units.
Our DIY bedframe with storage will require the following supplies:
-
- Measuring tape
- four 3-cube storage organizers
- Measurements for a ClosetMaid 3-cube unit: 36” H x 12” W x 12” D
- Substitute for any sturdy cube unit, bookshelves, or even wooden crates. Just make sure to measure, measure, measure!
- Measurements for a ClosetMaid 3-cube unit: 36” H x 12” W x 12” D
- One 1-cube storage organizer
- Plywood or slats cut to size
- Power Drill – cordless will be easier
- Screws
- Optional brackets to keep each 3-cube unit held tight to its neighbor
- Optional power saw
DIY Bedframe With Storage: Step One
- Lay the 3-cube units on their sides
- Place two of these units end to end to run the length of the bedframe, place the single cube unit between the two sides at the base of the DIY bedframe.
It should look like this:
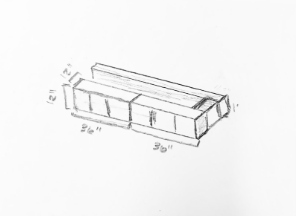
You can keep a small space between each cube (don’t worry, it’ll all be secured by the plywood and screws), or you can use brackets to hold each separate organizer together. Thus creating one long, 7-cube, u-shaped organizer.
Step 2:
-
- Measure the width of the DIY bedframe in preparation for cutting the plywood, or buying pre-cut slats. You can have your plywood cut professionally at your local home-improvement store. Just bring the measurements and select the plywood that fits best for your needs!
- If you’re making the cut on your own, remember to abide by the safety regulations laid out in the safety manuals of your power tools.
- An easy option is to purchase pre-cut slats, which you can find at most major home-improvement stores. Fully put together slats run a little higher price tag, but the upside is they’re pre-cut to size.
Step 3:
- Screw in the plywood or slats to the cubes. The cubes we’re using have a 2.3” thickness, so we won’t be using screws longer than 2”.
Optional Step 4:
Decorate your cubes with fabric, paint, or shelf-liner for a fun and personal touch!
Need More Tips? More Storage?
Now you have a fully-made, DIY bedframe with storage. Rather, you have the know-how and a plan. All plans take time, and until then, check out these other options for stowing away things neatly in your bedroom and under your bed.
There’s plenty of things you can store under there, from shoes to those sweaters you only need a few months out of the year. If you find you still need more storage, contact Albuquerque Self Storage today. We’re glad to help you with your storage needs!
Recent Posts

Top Security Features to Look for in a Self-Storage Facility
When selecting a self storage facility, security should be a top priority. Ensuring that your belongings are safe from theft, damage, and unauthorized access is crucial for peace of mind. Here are the top security [...]
The Ultimate Guide to Packing and Storing Seasonal Items
Seasonal items, such as holiday decorations, summer gear, and winter clothing, can take up significant space in your home. Properly packing and storing these items in a self-storage unit can help you keep your home [...]

Preparing Your Boat and Watercraft for Summer Fun with Self-Storage
As summer approaches, the anticipation of hitting the water for boating, jet skiing, and other aquatic adventures builds. Proper preparation of your boat and watercraft is essential to ensure a smooth, enjoyable season on the [...]