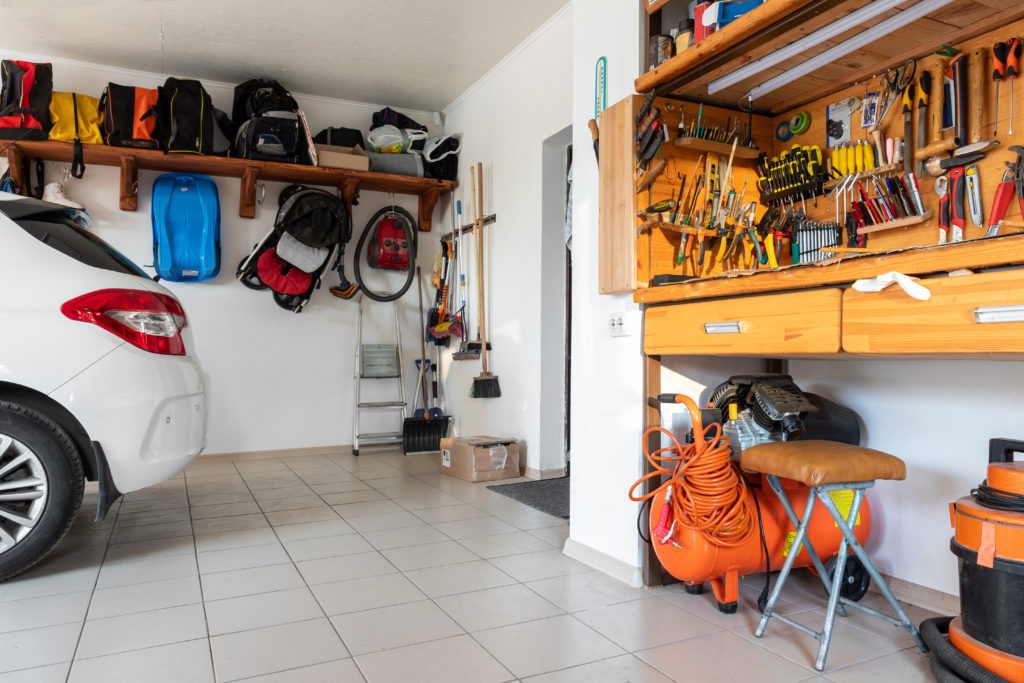
10 Clever DIY Garage Storage Ideas

We’ve all experienced the feeling of walking into the garage, ripe with enthusiasm to finally clean and organize it. We’ve all experienced what happens five minutes in — the unshakeable and overwhelming desire to quit, slam the door, and never look back. We’re here to tell you that it can be easy and inexpensive to organize your garage! Read on for our best DIY garage storage ideas to save you time and any future garage-related headaches.
Concrete Forming Tubes
If you’re looking for an easy and inexpensive way to store long and lean tools such as baseball bats, brooms, rakes, and so on, look no further than concrete forming tubes.
To prevent the tubes and tools from getting wet (inconvenient flooding has happened to the best of us), place them on a 2×4 platform and secure them against the wall with a plumbing strap. Even the clumsiest of kids won’t be able to knock over this handy storage hack!
Organize Your Paint
We’ve all seen what the aftermath of a room re-paint looks like for the garage. More often than not, those large, messy paint cans get shoved into a corner, never to be seen again.
Instead, keep all your paint in a handy storage latch box. You can find these at your nearest Target; they are plastic, portable, and easy to store. Before placing the paint cans in the storage bins, label the name of the color and where it is in your house on the top of the can. If you ever need a quick touch-up, you’ll know exactly where the paint is, and exactly which color to use!
Hanging Fishing Pole Racks
Unless you’re an avid fisherman or if you live on a lake, chances are you don’t exactly break out the fishing poles every weekend and head up to the nearest lake. An easy (and out of the way) storage solution for those long fishing poles is an inexpensive wire rack hung from your garage ceiling.
Here’s how:
Step 1
Gather up a few friends (even though the rack is light, you’re going to want their help during step 6).
Step 2
Assemble the rack. You can find many options at any hardware store near you.
Step 3
Find where the ceiling joists are located (ceiling joists are the horizontal beams that run parallel from one wall to the opposite wall). Mark the joists and studs that you will be using.
Step 4
Use an electric screwdriver to install ceiling brackets into the studs.
Step 5
Assemble and attach vertical rack pieces.
Step 6
Place your wire grid and attach it to the vertical pieces. This step is much easier with a couple friends helping you to hold the rack as you attach it.
Are you a visual learner? Check out this video to see this installation happen!
DIY Garage Storage: Bungee Cords
If you find that your basketballs, volleyballs, and footballs are always rolling around your garage floor, invest in some affordable bungee cords to keep them organized. All you have to do is hook the cords vertically around some wood framing, and then stack the balls one on top of the other. This way, you can easily and quickly reach whichever ball you want, while also preventing them from rolling around constantly.
Once you’re done with your DIY garage storage, get started on your house. Check out our article on creative storage solutions for your home!
Vertical Bike Storage
Bikes are a great way to get active and get outside, but they happen to take up a lot of precious garage space, especially if you have no way to store them conveniently. This DIY garage storage hack is one of our favorites: mount your bikes on a wall!
Instead of investing in a large rack that takes up half your space, try out some wall hooks. You’ll hardly notice your bikes pressed up against the wall, but they’ll also be super easy to take down wherever you’re in the mood for a mid-afternoon spin.
Toy Buckets
If you have kids, chances are your garage is scattered with loose sidewalk chalk, water guns, and sand castle molds. Try placing similar toys in buckets, and then labeling what each one contains. Next time it’s in the high nineties, you can simply grab the bucket with all the water toys and be on your way!
Pegboard Wall
Imagine this: You walk into your garage and glance at your workbench, which is completely covered with random small tools and miscellaneous items. It’s not only an eyesore; it’s dangerous. No one wants to accidentally step on a loose nail due to an unorganized space.
There’s an easy solution: get yourself a handy pegboard wall! Instead of shoving your tools in drawers and digging through them, they can be nicely displayed and easily accessible whenever you’re ready for your next project.
Here’s a general guide to creating a DIY pegboard wall.
Step 1
Measure your pegboard and create a wooden frame to go around it. Use a circular saw to cut the frame to your desired size.
Step 2
Use appropriately sized drywall screws to secure the frame around the pegboard.
Step 3
Attach the pegboard to the frame using drywall screws.
Step 4
Attach the pegboard to the wall by driving drywall screws through the frame into the wall studs.
No More Loose Nails
Stepping on a loose nail is the worst. For those of you with kids or pets, you definitely don’t want them finding loose nails around the garage. There’s an easy solution! Superglue a magnet to the bottom of your hammer to hold your nails in place. Then, the next time you’re DIYing a project, they’ll be right where you need them.
You can also glue a long magnet for your workbench to achieve the same effect! If you don’t want nails loose or out in the open, we recommend clearing out a section of your toolbox and keeping a magnet handy in there. That way, the nails will stick to the magnet and you’ll never have to worry about reaching in and poking yourself.
What to do with that Giant Ladder
Ladders can be a tricky thing to store, mostly because of their long length. Save yourself the worries of it toppling over onto your cars, and invest in some wall hooks. Hang your ladder horizontally along your wall to maximize your garage space!
Dying for more innovative garage hacks? Check out our article on the most creative garage remodeling ideas!
Clean It Out
Okay, while this might not be a DIY hack, it’s super important. Clean out your garage once a month! If you stick to this schedule, it’ll get easier and easier over time. The alternative (only cleaning your garage once a year, if that) can seem like a daunting and impossible task due to built up clutter.
Go through and donate or throw away anything you don’t use or need anymore. Doing this small step will make keeping your garage neat so much easier, and keep your space looking as great as the first day you organized it!
That’s it! Thanks for reading! We at Albuquerque Self Storage are here for all your self storage needs. If you find you just can’t fit everything neatly into your garage, try out one of our storage units for extra space. Give us a call at 505-431-6747 or visit us at our website here!
Recent Posts
How to Better Organize Your Pantry Cabinet for Parties
Were you aware that around 50% of Americans have at least one room in their home that they believe in beyond saving due to clutter? But one part of the house doesn’t usually enter such [...]
5 Industry Tricks to Lower Storage Unit Prices
When it comes to storage unit prices, finding cheaper facilities remains every person’s primary concern. But nobody wants to trade price for safety. Finding extra space for your belongings that is climate-controlled and 24/7-monitored shouldn’t [...]
Where to Keep Business Inventory: Office Storage Made Easy
The global self-storage boom didn’t occur out of nowhere; it emerged because homeowners and office workers need somewhere to store their extra belongings. If you run a small business, wish to own a startup, or [...]